Showing posts with label crafts. Show all posts

Saturday, December 7, 2013

An oldie, but goodie, Junky snowman ornament tutorial

I posted this 2 years ago, but thought it was time to share it again, just in time to adorn your Christmas tree!


Haaaaaapy Birthday!!


No..It's not my birthday, nor is it my blog's birthday, but when I finished these cute ornaments I immediately thought of good Ole Frosty the Snowman, and the first words he utters when he comes to life.
I'm going to tell you how you can make your very own!
For those of you who don't know me, one of my favorite places, (besides Thrift Stores, Antique malls and craft stores lol) is the hardware store. Now normally, you'll find me shopping at Home Depot, BUT Here lately I've discovered that the Menards 20 minutes away actually has about 3 times the selection (*Gasp* I know, Right?) and is actually quite a bit cheaper (Sorry HD...I still love you though!!)  So while Hubby and I were out for a rare date night (Endless Shrimp anyone?!?!) we popped into the Lancaster menards to look for smaller packs of peg board hooks (which they had..Menards 1 - HD 0) and some lazy susan hardware at a reasonable price (Menards 2 - HD 0) and while standing there looking at their unbelievable selection of hex nuts (once again, menards scores..3-0, menards' game) I was inspired. I just happened to see them in my head, Hardware snowmen! and you really can't beat the prices! I got enough hex nuts to make 6 snowmen and it was a whopping $4.42..including tax. Except the wire, I had that already, and it was purchased at Home Depot.

So here's your Shopping list:


24 gauge wire
E600
snowman body:
5/8 hex nuts
1/2 hex nuts
3/8 hex nuts
Hat
1/4 flat washer
2 1/4 hex nut OR 1 1/4 hex and 1/4 hex cap

Extra 1/4 hex nuts or beads/bells


1:  set a 5/8 hex nut on your working surface.

2: spread some E600 on one side of the 1/2 hex, place it, glue side down, onto the 5/8 hex.

3. repeat for the 3/8 hex.

4. on wrong side of the flat washer put some E600, place it onto the 3/8 hex

                                     
5. repeat for 1/4 hex

6. repeat for second 1/4 hex or hex cap.

7. set aside to dry

8. While snomen are drying, cut your wire into 5-6" pieces. Bend in half

9. half way down from the loop you formed in step 8, tie the wire into a loose knot. this can be done, it just takes a minute to work it into the right shape.

10. Slide your hex/bead/bell on 1 strand of wire. twist both strands together locking the bead onto the wire.

11. wrap extra wire up and around the top of the bead, this will be hidden between the snowman's hat and the bead.

12: thread the flattened loop throught the hex nuts and out the top of the snowman's hat. spread wire loop for hanging. and Voila! A hex nut snowman!

If you make one, please let me know, I would love to see them!

I party with Remodelaholic

Tuesday, February 19, 2013

Weekend news

As you may have noticed, I haven't posted the last 2 days, Not because there hasn't been anything to write about..
I just didn't.

Which is counterproductive to my goals for the blog. I will do better.


It is cold, rainy-sleety-snowy,,and did I mention cold? here today, I'm short on sleep and my knee and hip have been bothering me since I awoke yesterday. Still, I managed to make some pretties over the weekend., most were for BCA auctions, but I did get a pair of pillow slips made for the etsy store.
Made for the BCA auction--is sold


For the next BCA auction


https://www.etsy.com/listing/123939314/16-x-16-yellow-chevron-pillow-slip
And now, I think I will go nap..or sew...ok, nap it is lol

Until Next time!
Michelle

Tuesday, October 23, 2012

More last minute Halloween crafting!

So I've been working on some Halloween decorations over the past couple of weeks and realized that if I didn't share them soon I likely wasn't going to be able to before Halloween!!

 Some Skull art using an image from Graphicsfairy.com, and the burnished image transfer method.

I made this skull garland using Embroidery floss and some Target $1 bin erasers. I just threaded a long sharp needle and went through the soft eraser. (as a side note, I had plans to do the entire bag of these, but this is as far as a I got before my embroidery floss started breaking down. I highly recommend something that can withstand the friction better.)
 This was a fun project, I just drew the letters and exclamation point out on thin cardboard, painted the letters green and hot glued the dollar tree eyes all over. For the web, I painted a bit of lace black and dusted it with glitter, then glued it to the back side of the cardboard frame I left for just this purpose. The spider's body got the same paint and glitter treatment and then using my scissors, I just poked 4 holes on each side, and threaded 4 half pipe cleaners through from the back, hot glued the eyes on and called it done :)
I made these candles I saw on Polish the Stars blog yesterday. I need to redo the inserts as they aren't deep enough for my dollar store tea lights.

And that is it from me for now my friends, If I can fit more in before the big day I'll try my best to share!


Thursday, September 6, 2012

A new look for Jan

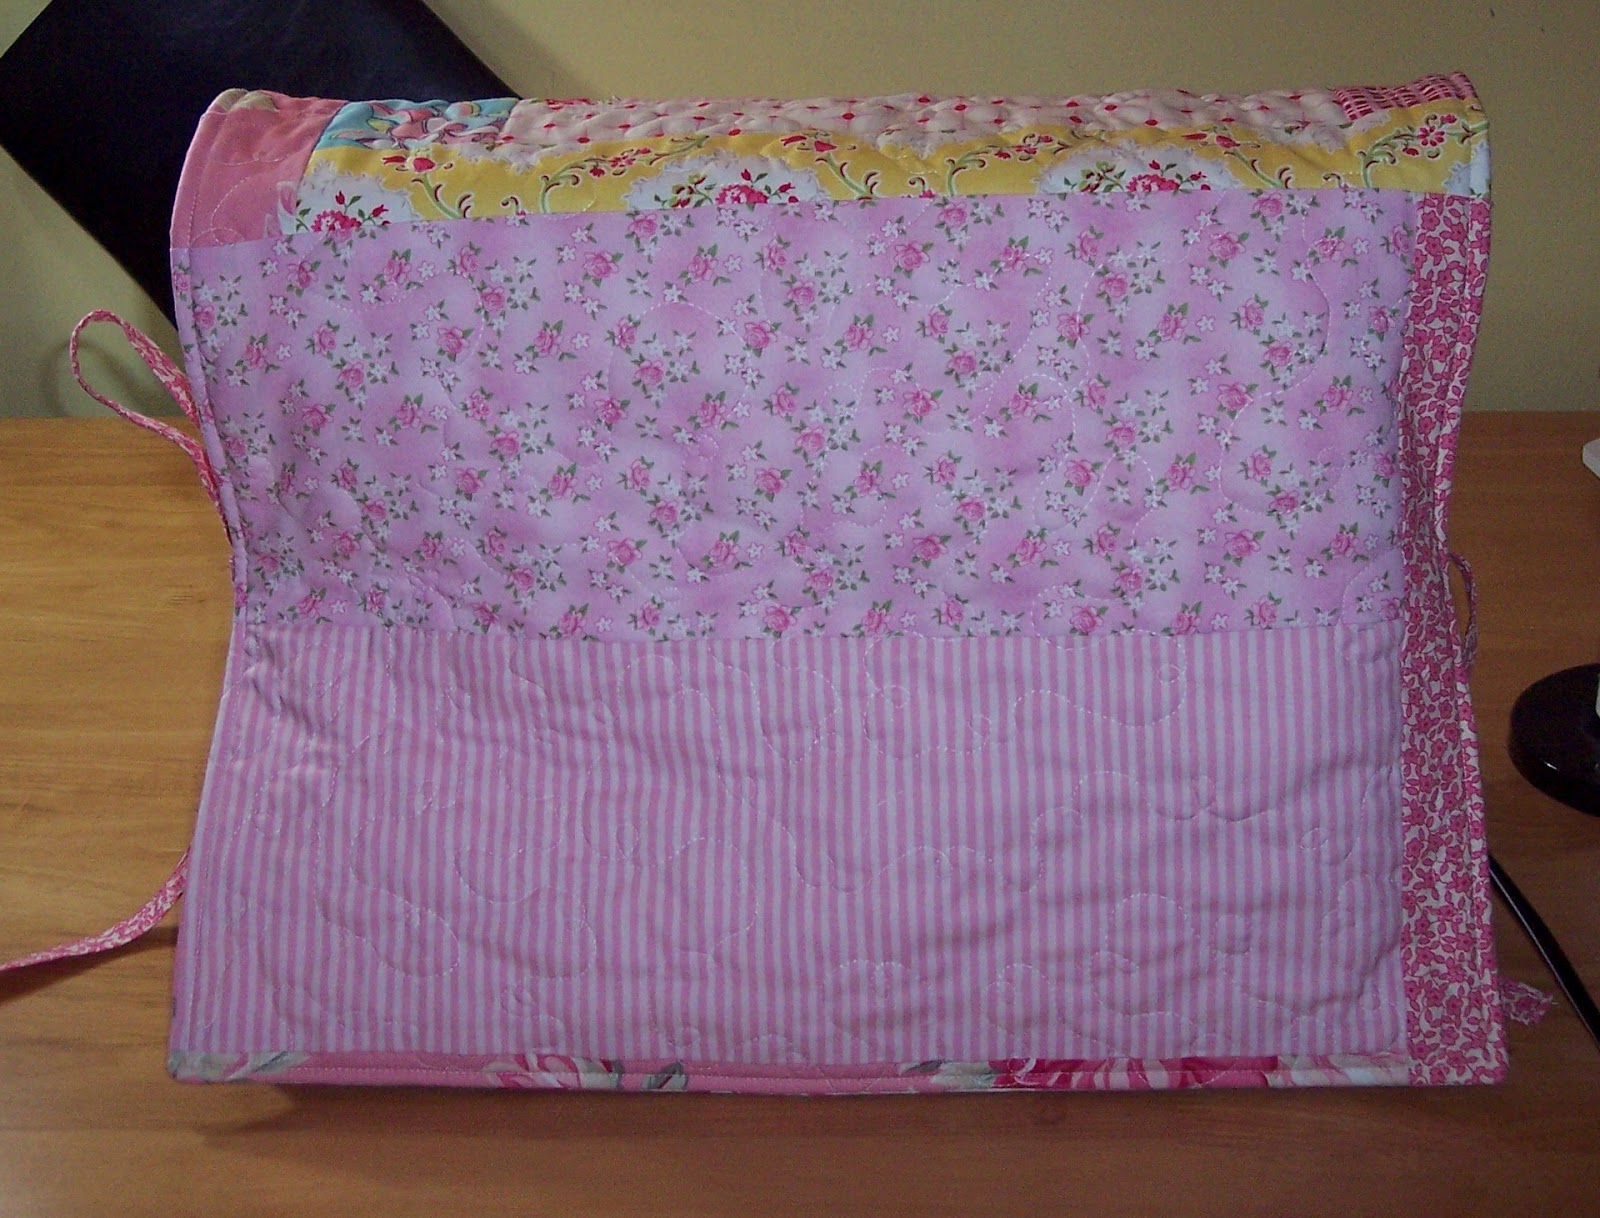
Today I thought I would share a little project I whipped up last night as part of my new-old sewing room makeover,

I didn't use a pattern or tutorial for it, although I have seen these type of covers many times in blogland.

I started with a line drawing of a dress form, which you can find here. You can use a transfer pencil, or do as I did and just lay the drawing under my white fabric and trace it. Then, using 3 strands of embroidery floss for the form, and 2 strands for the stand, I used a simple backstitch to stitch out the drawing.

After the embroidery piece was finished I just cut and added fabric pieces in a log cabin style manor until I had a large enough block for the front of my cover. For the back of the cover, I pieced together some large scraps. After sewing both sides of the cover together, I pressed and pinned it to my batting. Since I didn't plan to use a binding, I quilted the top of the cover to the batting only.


I added some ties and a pretty backing. Sewed them together right sides facing, leaving a hole for turning. Clipped my corners, turned and top stitched around the entire outside edge, closing the hole with the top stitching.

Tied it on, and just that easy, Jan has a new reversible cover for when she's not in use!

Stay tuned for more projects as I work on redoing my sewing room!


Linking up to these parties!
Handmade 52
                                Craftastic Monday

Friday, August 31, 2012

Saling, saling, saling...

Today I got to go out and do a bit of yard Saling. Armed with a budget of $50 for the weekend (it is labor day after all!) Today I spent right about half.

My first stop didn't amount to anything, lots of stuff, just nothing for me. The next one I didn't even stop, All I could see were dozens of golf clubs and golf bags.

Finally my third one was a good one, if only I was in the market for some vintage furniture! A 4 piece (settee, arm chair, rocker and side chair) for $100! They were solid, and only needed some cosmetic work and new seats cut, which isn't as hard as one might think. Alas, I promised Bill no more furniture.

All wasn't lost though. I picked up a cute wooden hanger that will get prettified, a wooden bowl to replace our fruit basket (that keeps tipping off the edge of the microwave where it lives, Don't worry, I've got plans for the basket in my sewing room.)  An antique quilt top in need of some serious help, some vintage fabric, lots of doilies to make myself some dish towels (and maybe even a quilt) a'la Vintage Grey style Some #5 pearl cotton spools, a pyrex bowl and a little cubby with lots of vintage buttons. Oh! and the shoes will be getting a coat of Krylon Glitter Blast in red to make my own version of this Idea I found via Pinterest!


Also among my finds for the day was this gun rack for minion 2..He's really into Air softing and has quite a few air soft guns, I'm really into his crap being put away so this was a win win ;)


and this shelf. I had already planned to give it a facelift, but as I was putting it into the truck, the top came off completely and so now it needs a little repair as well.That's ok though, it will be gorgeous when I'm done with it, and will house my mason jars of bits and bobs in my sewing room ;)

All in all not a bad afternoon. And I can do it all again tomorrow..or get some pretty fabric instead...

Ah well, Time to fix dinner, then take Minion 1 to work before I get back to cleaning out my old-new sewing room some more!
   
Later!

Tuesday, July 3, 2012

Fabric envelopes tutorial

Today I thought I'd share how I made my fabric envelopes for my coupons. These could be used for so many other things, the cash envelope system, a savings tool for children, just to name a few that popped to mind at the moment.

Don't be afraid of the number of steps in this tutorial, I will be giving complete step by step instructions so that even the most novice of sewing enthusiasts will be able to whip these up.


What you will need for each 4" x 8" envelope.
Vinyl -  2" x 3" piece (this is usually sold with tissue paper between the layers, do NOT discard, you will need it to sew with.)
Binding- 1.5" strip for binding the edges of the vinyl
Decor bond - 9.5" x 8"
Outer fabric- 10" x 8.5"
Lining fabric - 10" x 8.5"
Velcro - 5" piece
Thread
scissors
ruler
pins
sewing machine
Iron

We will begin with binding the edges of our vinyl window.


 1.  Take your 1.2" binding strip and trim the selvage off one end. fold the top corner down to the bottom edge of the strip (wrong sides together) to for a diagonal end. press.

2. fold binding in half, wrong sides together. press.

3. making sure that the tissue paper is under your vinyl piece, line the raw edge of the binding strip to one of the 3" sides of the vinyl, with the point ending 1/4" shy of the bottom corner. sew with a 1/4" or scant 1/4" seam allowance stopping 1/4" from corner. back tack and remove from machine.

4. fold binding strip up to line raw edge up with 2" side of vinyl hold diagonal fold, then fold the strip straight down. sew along edge and stop 1/4" from corner and remove from sewing machine.

5. Repeat step 4 until you reach the straight edge of your diagonal fold that you began with.

6. trim off your strip and feed under the straight edge. the diagonal fold will hide for a casing for the raw end of your binding, hiding it inside.

7. trim threads and remove tissue paper.

8. flip window over and pull folded edge of binding to the front. it will look like a shallow box at this point.

9. starting with your ending/beginning diagonal fold, fold against the vinyl and sew down. when you get close to a corner, fold the other side down to for a mitered corner, turn and continue sewing next side of the binding down. repeat until all sides have been sewn down.

10. trim threads and set aside.

Now we will work on the body of our envelope.

1. Press decor bond to back side of lining piece, centering so that 1/4" of material "frames" the decor bond.


2. press outer fabric. place right sides together with the interfaced lining and pin around edges.

                       (this is me, not following my own instructions about pinning...I highly recommend pinning!)


3. with a 1/3" seam allowance, and starting on a lower side, sew around the edges, making sure to leave a 2" gap for turning. (helpful hint: when you get to the end of your sewing, turn your fabric and sew across the seam allowance, this will make it easier to fold your edges in after it is turned)

4. trim corners

5. turn right side out, using a turning tool, or blunted point to poke corners out.


6. press, being sure that your opening is even with the rest of your outside edge.

7. top stitch across the bottom edge


8. finding your fold. Now we will bring our bottom edge up, lining sides together, to form the pocket of the envelope. I folded mine so that there were 2" of my fabric piece sticking up to form the flap that will fold over to close. Press the fold.

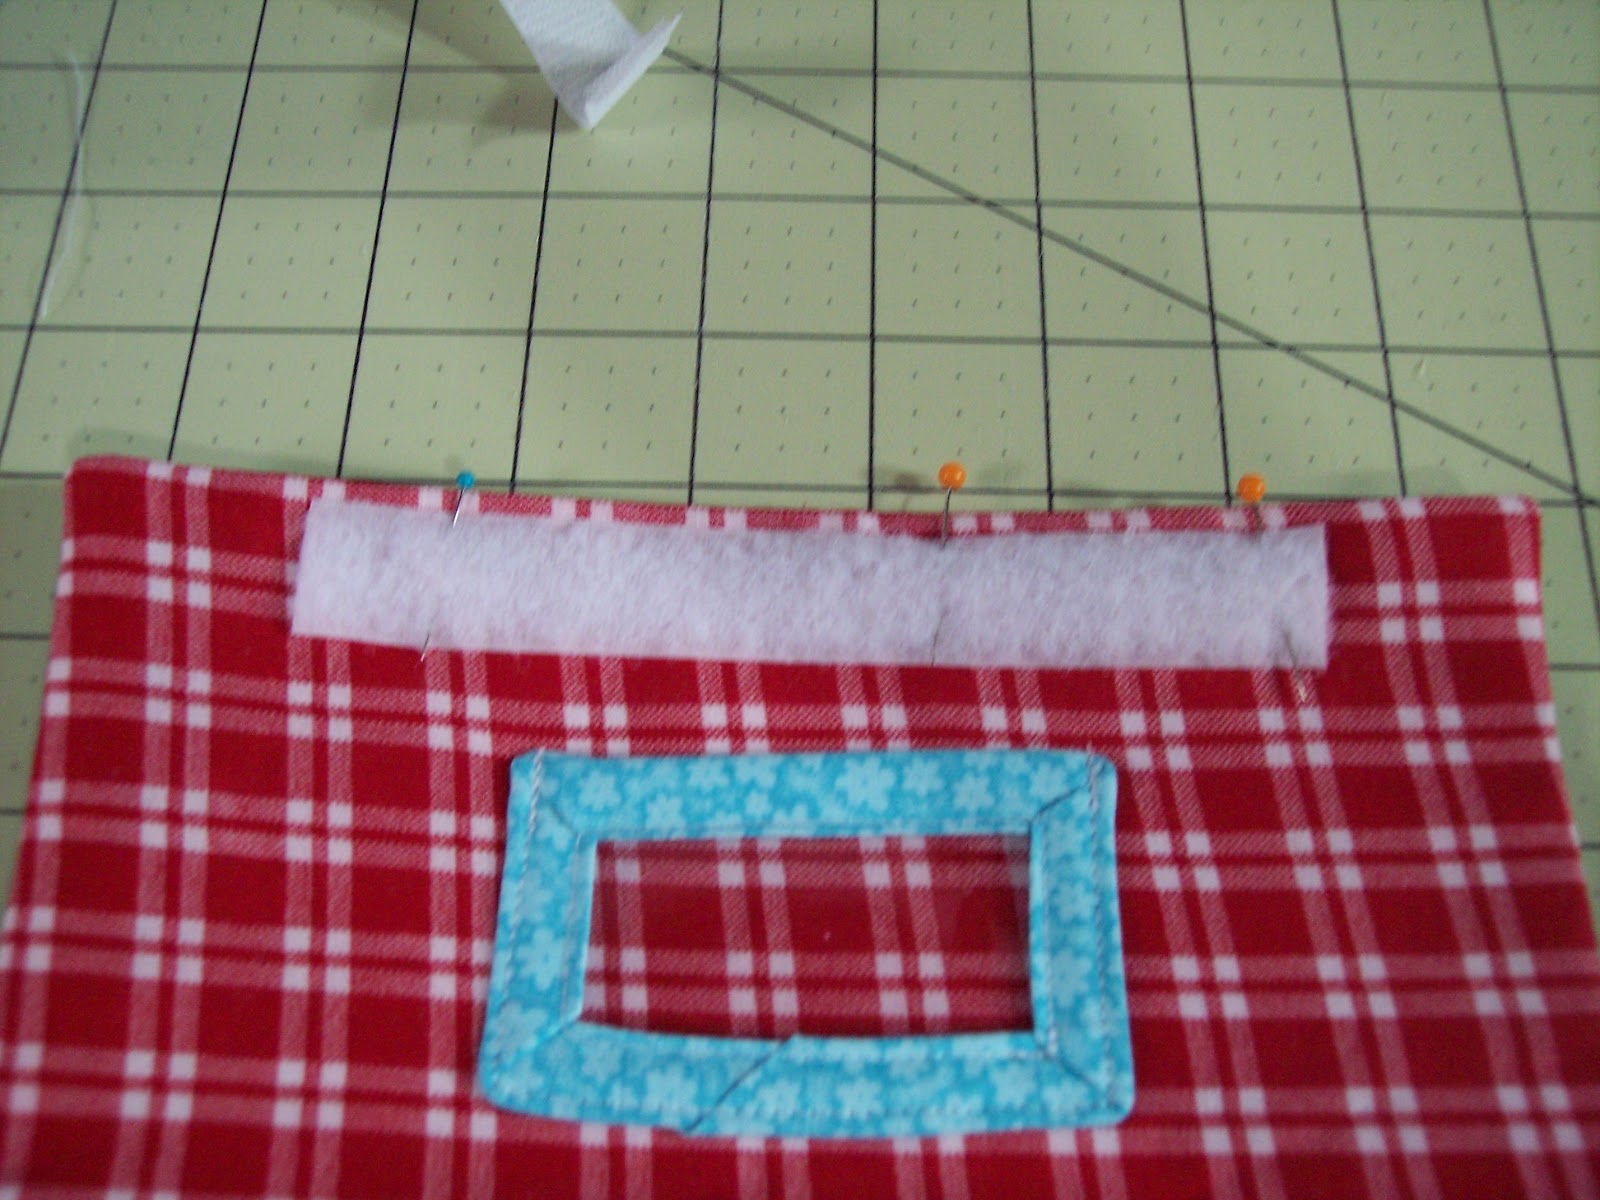
9. Adding velcro. Here you will be adding velcro to both sides of your fabric piece. On the bottom of your piece we will be working on the outside fabric. Pin fuzzy side of the velcro down along the edge, maching the top of the velcro to your top stitching. Sew into place.
.
(As you can see, in this picture I had already sewn on my window, for the rest of them, I discovered it was a much better idea to velcro first!)
Now on the top edge, and lining side of your project pin the sticky side of the velcro and sew into place


 10 Now that you know where your bottom fold is, place your label window centered between the bottom of the velcro strip and the fold. Sew into place making sure to leave the top edge open for labeling
.
 .
 11. creating the pocket. starting at the bottom left hand corner, top stitch around both side and the top flap. (you can also edge stitch the bottom if you like, it isn't necessary, but some prefer the look) reinforcing the stitching at the top of the pocket.


Print or write out your label, insert it into the window and you are ready to go!