Showing posts with label Tutorial. Show all posts

Saturday, December 7, 2013

An oldie, but goodie, Junky snowman ornament tutorial

I posted this 2 years ago, but thought it was time to share it again, just in time to adorn your Christmas tree!


Haaaaaapy Birthday!!


No..It's not my birthday, nor is it my blog's birthday, but when I finished these cute ornaments I immediately thought of good Ole Frosty the Snowman, and the first words he utters when he comes to life.
I'm going to tell you how you can make your very own!
For those of you who don't know me, one of my favorite places, (besides Thrift Stores, Antique malls and craft stores lol) is the hardware store. Now normally, you'll find me shopping at Home Depot, BUT Here lately I've discovered that the Menards 20 minutes away actually has about 3 times the selection (*Gasp* I know, Right?) and is actually quite a bit cheaper (Sorry HD...I still love you though!!)  So while Hubby and I were out for a rare date night (Endless Shrimp anyone?!?!) we popped into the Lancaster menards to look for smaller packs of peg board hooks (which they had..Menards 1 - HD 0) and some lazy susan hardware at a reasonable price (Menards 2 - HD 0) and while standing there looking at their unbelievable selection of hex nuts (once again, menards scores..3-0, menards' game) I was inspired. I just happened to see them in my head, Hardware snowmen! and you really can't beat the prices! I got enough hex nuts to make 6 snowmen and it was a whopping $4.42..including tax. Except the wire, I had that already, and it was purchased at Home Depot.

So here's your Shopping list:


24 gauge wire
E600
snowman body:
5/8 hex nuts
1/2 hex nuts
3/8 hex nuts
Hat
1/4 flat washer
2 1/4 hex nut OR 1 1/4 hex and 1/4 hex cap

Extra 1/4 hex nuts or beads/bells


1:  set a 5/8 hex nut on your working surface.

2: spread some E600 on one side of the 1/2 hex, place it, glue side down, onto the 5/8 hex.

3. repeat for the 3/8 hex.

4. on wrong side of the flat washer put some E600, place it onto the 3/8 hex

                                     
5. repeat for 1/4 hex

6. repeat for second 1/4 hex or hex cap.

7. set aside to dry

8. While snomen are drying, cut your wire into 5-6" pieces. Bend in half

9. half way down from the loop you formed in step 8, tie the wire into a loose knot. this can be done, it just takes a minute to work it into the right shape.

10. Slide your hex/bead/bell on 1 strand of wire. twist both strands together locking the bead onto the wire.

11. wrap extra wire up and around the top of the bead, this will be hidden between the snowman's hat and the bead.

12: thread the flattened loop throught the hex nuts and out the top of the snowman's hat. spread wire loop for hanging. and Voila! A hex nut snowman!

If you make one, please let me know, I would love to see them!

I party with Remodelaholic

Friday, December 7, 2012

Pillowcases....A tutorial


Ok, I know what you're thinking, there are already a lot of pillowcase tutorials out there in Blog-land. It seems that everyone has their own version of the 15 minute pillow case tutorials, which are great, and I have recently made some that way myself, but what about that great fabric that has a directional print..going the wrong way?

Yes, you could just cut the fabric 44" in length and then trim 8" off the sides, but what a waste of fabric!!

For years I've been making pillowcases this way..and they turn out just as cute, and still have completely enclosed seams, but uses LESS fabric than the 15 minute pillow case..

Before we get started, an explanation of terms and additional information for purchasing the right directional fabric for this tutorial.

1. Main fabric ~
         This will be the directional print fabric you will be using for the body of your pillow case. You
         should look for a fabric that is printed so that when you are holding the bolt horizontally, the
         print is facing the correct direction, like so:
 2. Contrast fabric ~
        This will be a solid or print that contrasts, but still ties in to the main fabric, for example, were I to
        use the flannel in the picture above, I would choose a Pink, or one of the darker purples to
         coordinate. If you were to choose a print for the cuff, it should be printed in the opposite manner
         of the Main body fabric.

3. French seam ~
        A french seam is a technique used in high end fashion that encloses the raw edges of your fabric.
        No need to worry, I show you how to do those in the instructions!

4. Top stitching ~

A sometimes decorative, sometimes functional stitch that is usually 1/4" from the edge of a seam. It is visible because it is done on the top of the item.This can be done in same or contrasting thread, depending on the decorative effect one wishes to achieve.

5. Cutting ~
      If you are new to a cutting mat and Rotary cutter, there are a lot of tutorials out there, but I think this
      is one of the best: http://www.sewingweb.com/Projects/RotaryCutting/
   
     If you will be using scissors, measure out 22 inches on the fold edge, mark with a pin, and measure
     again to confirm. It's just like you learned in shop class, measure twice, cut once. Repeat on the
     selvage side. Now laying your fabric flat, carefully cut straight across the fabric from 1 pin to the other.


What you will need:
22" by WoF of  your Main fabric
12.5" by Wof of your contrast for the cuff


General supplies:
Thread to match
Sewing machine
Rotary cutter and mat or other measuring/cutting combo
Pins
Iron and ironing surface


First we are going to make the body of the pillowcase using a french seam.
Trim off your selvage,


 and then with a 1/8" seam allowance sew down the long sides wrong sides together.


Now we will turn our pillowcase inside out and press those seams to one side or the other.., then fold the case so that the sewn seams are on the long edges, and press flat.


Now, sewing with a 3/8 seam allowance, sew the long sides of the case Right sides together, this seam will encase the raw edges of the fabric for the body of our case.

Take a little break to cook lunch for the family, and nab a cute kitty pic..start editing the picture only to then realize just how dusty the TV stand (where said kitty knows she isn't allowed) is and decide NOT to post it on the blog..and assign dusting to a minion ASAP..and move on to the cuff portion of our tutorial.


First you'll want to press your 12.5" x width of fabric piece open. Then you are going to fold the long edge down to 1/2' above the bottom long edge, and press the fold,  like so:

When you open the fold back up, the side with the crease tented up will serve as our right side when we sew our cuff loop.

So,   Now we will take our short ends and match them up, right sides together. You should have a 5-8" seam allowance, but since fabric widths vary, Lay out your case body, and, matching your short fold to one side, use a pin or a pen to mark on your cuff piece, where the case opening ends..For the visual learners out there:


This will mark your seam allowance for your cuff. Sew the short sides together, press seam open.

Next, pin your cuff to the case body,  making sure that you are pinning the short side of the creased fabric, wrong sides together.


Sew cuff on using a 3/8" seam allowance. Pull cuff fabric out, then turn the entire case inside out and press the seam towards the cuff like so:

This is where I notice a trend, My machine could use a good cleaning too..Didn't I *just* do this?!?!
This is where the crease we made at the beginning of working with the cuff will come in handy.
USing the crease as a guide, fold your cuff down and over the seam allowance, turn edge under 1/2" and press, being sure the the original fold line stays true.

Now, using a 1/8-1/4" seam, top stitch your cuff down along the crease that you just created.


Put a pillow in and marvel at your pillowcase..with the fabric going the right direction ;)


These make a great Gift, or, I've been known to make one to use as a gift bag, it just doesn't get much greener!
'til next time,


Tuesday, October 23, 2012

More last minute Halloween crafting!

So I've been working on some Halloween decorations over the past couple of weeks and realized that if I didn't share them soon I likely wasn't going to be able to before Halloween!!

 Some Skull art using an image from Graphicsfairy.com, and the burnished image transfer method.

I made this skull garland using Embroidery floss and some Target $1 bin erasers. I just threaded a long sharp needle and went through the soft eraser. (as a side note, I had plans to do the entire bag of these, but this is as far as a I got before my embroidery floss started breaking down. I highly recommend something that can withstand the friction better.)
 This was a fun project, I just drew the letters and exclamation point out on thin cardboard, painted the letters green and hot glued the dollar tree eyes all over. For the web, I painted a bit of lace black and dusted it with glitter, then glued it to the back side of the cardboard frame I left for just this purpose. The spider's body got the same paint and glitter treatment and then using my scissors, I just poked 4 holes on each side, and threaded 4 half pipe cleaners through from the back, hot glued the eyes on and called it done :)
I made these candles I saw on Polish the Stars blog yesterday. I need to redo the inserts as they aren't deep enough for my dollar store tea lights.

And that is it from me for now my friends, If I can fit more in before the big day I'll try my best to share!


Sunday, October 21, 2012

Mummy pillow tutorial..ish?


I started out with the best of intentions on this project, taking lots of pictures, then I got caught up in it and the camera sat idle. Fortunately it's a fairly easy project so I am sure you all can follow along even if there aren't as many visuals!

Supplies:
1 yard 45" unbleached muslin
1 fat quart backing fabric
green and black scraps
black embroidery floss (optional)
poly-fil (or equivalent)
sewing machine, thread, scissors, hand sewing needle

Since I was making an actual pillow and not a pillow cover, I started with a 16" square of the muslin for my base. Then, using my scissors I made random snips in the folded edge of the remainder of the muslin and then tore the stips apart.

 Then lay out your first strip


Pin in place


 and sew it down, Then snip the remainder of the strip off at the edge of the pillow foundation (I was able to get 2 pieces on the pillow front from each strip, plus a little left over for on the corners)


 repeat in varying angles until you have covered your foundation


 and here is where I stopped taking pictures LOL!

Once I had my foundation covered, I cut out some ovals for eye out of my green, then smaller circles for pupils out of black, and sewed them on using my machine's blanket stitch. you can also use a straight stitch or even a zig zag.

When your front is finished, press, then trim down to a 15" square and set aside.

Cut your fat quarter into a 15" square for your back. Pint the two sides together, right sides facing and sew around leaving a 3" space on the bottom edge for turning and stuffing.

Clip your corners, and turn. Then using poly fill as directed, stuff your pillow. you will want to stuff it firmly as after some use the poly fill will condense and you don't want a flat pillow! Hand stitch your opening closed.

Now, due to my hubby and youngest son's insistence that my mummy needed a mouth. I threaded up some black embroidery thread and stitched one on. I think it actually made it look like a friendly mummy, which is just fine with me ;)


Tuesday, July 3, 2012

Fabric envelopes tutorial

Today I thought I'd share how I made my fabric envelopes for my coupons. These could be used for so many other things, the cash envelope system, a savings tool for children, just to name a few that popped to mind at the moment.

Don't be afraid of the number of steps in this tutorial, I will be giving complete step by step instructions so that even the most novice of sewing enthusiasts will be able to whip these up.


What you will need for each 4" x 8" envelope.
Vinyl -  2" x 3" piece (this is usually sold with tissue paper between the layers, do NOT discard, you will need it to sew with.)
Binding- 1.5" strip for binding the edges of the vinyl
Decor bond - 9.5" x 8"
Outer fabric- 10" x 8.5"
Lining fabric - 10" x 8.5"
Velcro - 5" piece
Thread
scissors
ruler
pins
sewing machine
Iron

We will begin with binding the edges of our vinyl window.


 1.  Take your 1.2" binding strip and trim the selvage off one end. fold the top corner down to the bottom edge of the strip (wrong sides together) to for a diagonal end. press.

2. fold binding in half, wrong sides together. press.

3. making sure that the tissue paper is under your vinyl piece, line the raw edge of the binding strip to one of the 3" sides of the vinyl, with the point ending 1/4" shy of the bottom corner. sew with a 1/4" or scant 1/4" seam allowance stopping 1/4" from corner. back tack and remove from machine.

4. fold binding strip up to line raw edge up with 2" side of vinyl hold diagonal fold, then fold the strip straight down. sew along edge and stop 1/4" from corner and remove from sewing machine.

5. Repeat step 4 until you reach the straight edge of your diagonal fold that you began with.

6. trim off your strip and feed under the straight edge. the diagonal fold will hide for a casing for the raw end of your binding, hiding it inside.

7. trim threads and remove tissue paper.

8. flip window over and pull folded edge of binding to the front. it will look like a shallow box at this point.

9. starting with your ending/beginning diagonal fold, fold against the vinyl and sew down. when you get close to a corner, fold the other side down to for a mitered corner, turn and continue sewing next side of the binding down. repeat until all sides have been sewn down.

10. trim threads and set aside.

Now we will work on the body of our envelope.

1. Press decor bond to back side of lining piece, centering so that 1/4" of material "frames" the decor bond.


2. press outer fabric. place right sides together with the interfaced lining and pin around edges.

                       (this is me, not following my own instructions about pinning...I highly recommend pinning!)


3. with a 1/3" seam allowance, and starting on a lower side, sew around the edges, making sure to leave a 2" gap for turning. (helpful hint: when you get to the end of your sewing, turn your fabric and sew across the seam allowance, this will make it easier to fold your edges in after it is turned)

4. trim corners

5. turn right side out, using a turning tool, or blunted point to poke corners out.


6. press, being sure that your opening is even with the rest of your outside edge.

7. top stitch across the bottom edge


8. finding your fold. Now we will bring our bottom edge up, lining sides together, to form the pocket of the envelope. I folded mine so that there were 2" of my fabric piece sticking up to form the flap that will fold over to close. Press the fold.

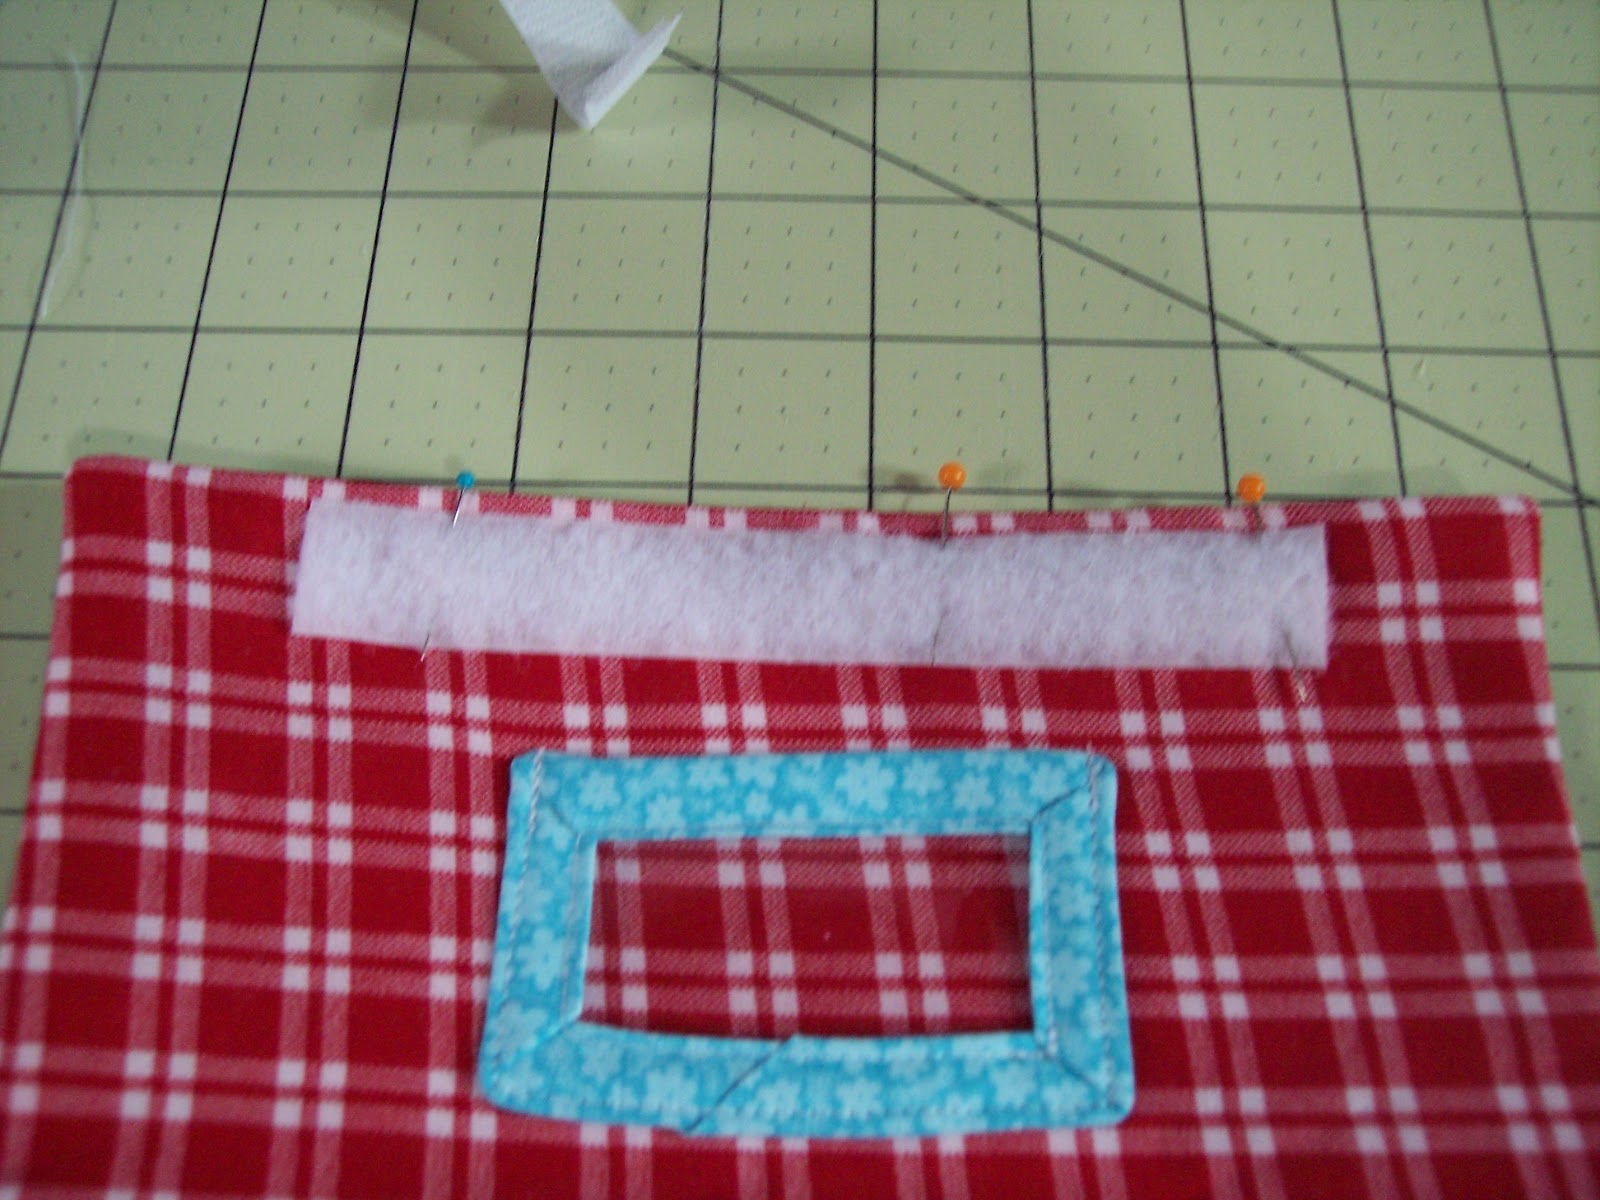
9. Adding velcro. Here you will be adding velcro to both sides of your fabric piece. On the bottom of your piece we will be working on the outside fabric. Pin fuzzy side of the velcro down along the edge, maching the top of the velcro to your top stitching. Sew into place.
.
(As you can see, in this picture I had already sewn on my window, for the rest of them, I discovered it was a much better idea to velcro first!)
Now on the top edge, and lining side of your project pin the sticky side of the velcro and sew into place


 10 Now that you know where your bottom fold is, place your label window centered between the bottom of the velcro strip and the fold. Sew into place making sure to leave the top edge open for labeling
.
 .
 11. creating the pocket. starting at the bottom left hand corner, top stitch around both side and the top flap. (you can also edge stitch the bottom if you like, it isn't necessary, but some prefer the look) reinforcing the stitching at the top of the pocket.


Print or write out your label, insert it into the window and you are ready to go!